Today I have been placing the Pyro explosion in Shot 5. Scaling and tweaking the Pyro. Since testing Pyro is time consuming very few things could be accomplish today.
I got the Pyro looking somewhat like the researched explosions on the internet.
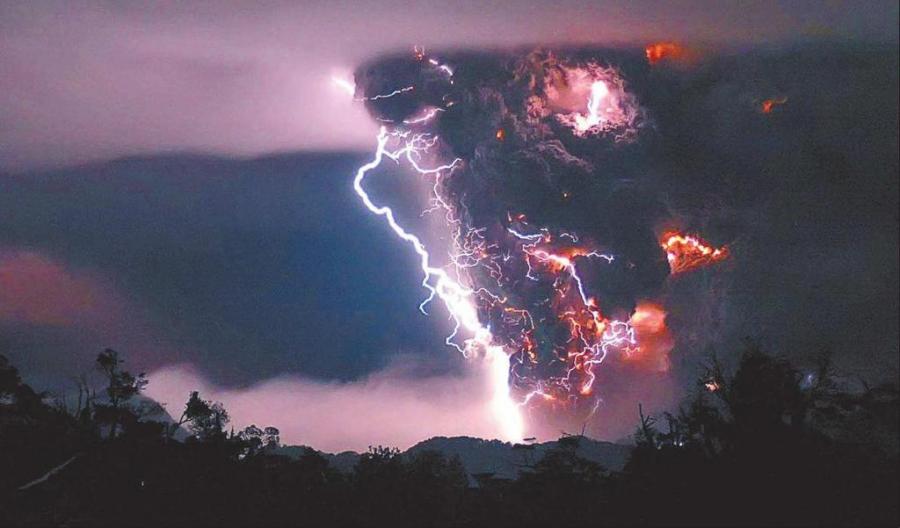
I was trying to get reference on the explosion, so at least I've sort of a target to work towards to. Here are some of the references Mr. Ron wanted.
Picture reference - Volcano eruption in Chile
Video
There weren't really explosions in the picture so I tried finding for a same effect. I believe the effect Mr.Douglas wanted was a round, dense explosion, more of a "firework" shape. First thing that comes to my mind was underwater mines going off.
Finding Nemo - Underwater Explosion
Super Nova Explosion in space.
With this explosions without the water and with pyroclastic dust.
I found this on a forum. I think I can use it after a tweaking and adding pyroclastic dust.
Today Mr.Ron came in and taught me couple of things. Firstly he taught me how to fade of the spries according to its life with a ramp to control the timing.
alpha ramp
And also I asked him about the rotation of the sprites. As normally in other scene files they show the sprites rotation in a direction, clock-wise or anti-clockwise. What I wanted was, as the explosion comes from a source the rotation have to be away the blast.
So, he taught me the how to rotate the sprites in 2 opposite directions. By having a $F * sign($TX)*10, the rotation will be along TX but in opposite sides and the rotation velocity will be constant and not increase.
simple illustration
adding expression to rotation
I notice there are some problems though, as the rotation is only to X axis the rotation does not look good from sideways. The rotation will be inverted if the view is from behind where the X-axis is pointing to the other direction.
He he later then taught me on adding motion blur to the particles. Blurring the hard lines when rotating as well as giving the effect of where the particles are coming from.
Today I worked on the dust and this is what I got.
Fixed the dust.
Mr.Ng came in and viewed my work and advised me to have the randomisation of the shape and sizes of the rocks to be more various.
So the researched began again. Luckily I remembered Lu Sheng did almost the same stuff as me in SESI, but it wasn't what I wanted. From there I linked to other group members, and stumbled upon Jia Bao's Dragon Flood project. There he did some rocks and I took reference from how it was done and redid with my version.
Rock network
It was basically using mountain to deform the sphere and having more surface noise added to it by Vop Sop.
Vop Sop Network
I created the material shader as well.
Surface Shader Network
Render Display
I asked Mr.Douglas about the surface material of the debris and he adviced it to be something like the floor material Wei Jie's been working on but not as detailed.
So far the explosions have had great response from the lecturer's and Mr.Douglas, very glad of that phew~ So determined to finish the project with all I've got! :)
Today I am working on the particles being affected by the explosion. So the dust and debris does not just goes up and down with noise variance but also away from the blast.
So I went to research on nodes I could use and checked out forums for related effects. So I found this node called attractor but did not know how I suppose to use it. The help information for it was very vague. Luckily later on Jia Bao dropped by and helped me out. I was suppose to create the source of the force with a metaball.
Metaball
Attractor node in the debris's popnetwork
Attractor node in the dust's popnetwork
here's the video
Right now the dust is blown up and flying very high, enveloping the scene. Will fix on that tomorrow.
Today Mr Pang visited us. And I showed him my problems he told me that I should try $ID and taught my the functions. And it works! Problem solved!
The problem was that the points of the particles keeps recycling as another dies as I was using $PT. ID is constant and will not change if particles dies.
I am now working on the attractor to create the blast.
Today I was tweaking the impact wave. I solve some of the problems and some appears. The rotation of the debris was done. I changed the emission of the particles from the same source as the sprites.
I realise there was a problem whenever the particles dies the copy stamp will have errors. The Stamp helps me duplicate the rocks with different scales to a each particle. But it seems after one particles dies the scale go haywire and the value of the scale jumps making it go big and small randomly.
Later on Mr.Douglas came and briefed on what we should be working on already. And everything should be ready. I was assigned to produce some pyro explosions in the clouds in shot 5.
And I forgot to ask Mr.Ron about the sprites popping. Mr.Douglas told me that I could try decreasing the visibility of the sprites as the age grows so when it dies there disappearance would be smooth.
Mr. Ron showed me an example for dop with pop. Instead of having the dop in the pop, he did it the other way around.
I also tried RBD points and it does a transformation from points to objects. Both are really good tools but they doesn't work with the scene. I guess I have to continue researching.
Today I spent most of my time researching on nodes that might help me with the rigid that I'm achieving and also tried different nodes.
For example instancing, but it replaces an object with another at render time.Tried torque as well but it just gives rotation to the particles.
Then I found this forum on odForce (thousand RBD objectthe best way to bring down one thousand RBD object). The forum mentioned about RBD points. I will check on it tomorrow
I make the sprites appear in the scene much smoother by adding $age which makes it appear from small to big over time. But the disappearing of the sprites still remains as a problem I encounter another problem today, when the particle are emitted into the air there are space below making the scene unrealistic I solved it with a split node which duplicate particles.
without split.
with split and some noise variance.
There's another problem occurring. The particles tend to leak even when I added a death on collision on the collision node. I added limit node to use as a double precaution.
leakage of particles
So far for today I tweaked the looks for the dust.
I did the emission of particles taught from Mr. Ron. I shall explain how it is made.
Attrib transfer.
This is done by creating a grid above the wave. To know that the attribute is transferred both the wave and grid is coloured white for the grid and black for the wave. By tweaking the "Distance Threshold" waves that I want to be selected will be white. After doing so I delete it off to separate it and connect it to a pop, which is then source is used to emit particles from the deleted polygon.
At first I tried adding noise but the stones starts rotating. I tried rigid body for the stone that replaces the particle but it doesn't work. And Mr. Douglas made a visit today after mocap and tell me that the sprites are flicking a lot which I din't notice until now.
I realised that the stone are all very even and are uniformly aligned.
PROBLEM:Uniform spacing between one another.
SOLUTION.
The null is there to generate nothing and the switch is to choose the null or the rock. Finally I add the switch to the copy node. I randomised the switch between the null and rock by adding rand($PT*3) to the copy stamp. 'rand" is a jumping value between 0 to 1 and since the switch ,between the rocks and the null, are 0 to 1 this produce a random creation of the rock and nothing.
SOLVED!
This was the test before I applied to the scene.
And after I tried on the emission of particles. I tried adding metaball force to the particle. And It has a rather interesting effect.
radial force metaball
The radial force blows the particle away slower that the impact wave but eventually catches up. This makes as if there is another wave of force from the centre of the explosion. I can definitely use this for the explosion. But the end of the day is near and I'mma stop here for the day.
For the ideas ahead, I think I will make the rigid body for the rocks as for right now they are just translated by the Y-axis. Not obvious from far view but will definitely be seen in close shots. Some rotation would be nice.
Today Mr. Douglas came to view on our progress and I showed him my impact wave. Overall he liked the idea but also advised me to have some noise in the particles. He also advised me to use metaball as there would be more controls in controlling the particles. Luckily for me, I did the tornado tutrial which had the metaball force he was talking about.
Mr.Ron also came to help every one of us. And he showed me various ways that I could do the wave and also emit particles.
dynamics
dynamics network
This uses a metaball which then acts as a magnet and it is dropped from above the grid. It then "attracts" points of the grid to it. Basically it is like a ball being dropped in a water. I will definitely test it tomorrow.
another method of emission particles from the wave
the highlighted nodes shows how its done.
This is done by selecting the surface with is above the ground, that means the wave and separating it by deleting and uses source from the pop network to emit from the surface.
For tomorrow I think I will try using Mr.Ron's method of emitting the particles and use the metaball which I learn from the tornado tutorial to add a little swirl to it. Hopefully it works!
Now I'm gonna have dinner on my own, May is having her delicious meal with her family..
For yesterday and today I returned to impact wave. Previously my RND and testing was in non-commercial and wasn't to scale. So I reference back from the old files and redid them in the commercialized version and also added the reference scale in to have the proportions right.
Firstly I plan on how to improvise my effect. Previously I thought of having my impact wave to be just a pressurised air, meaning to have it low in opacity but thicker in density. But since I have 2 more months of working period I thought why not render hard. I began referencing more on impact wave and saw "The Hurt Locker" explosion scene where pebbles float not because of the blast but instead the impact wave.
EPIC EXPLOSION SCENE
So time to walk the walk!
Impact wave body.
Impact wave network
So this is where I last tested the effect.
Debris Network
And by using the wave I am able to emit particles from the points of the wave. Making as if the wave pushed the particle up.
Derbis
I replaced the particles with platonic solid to represent it as rocks.
rock network
I also used platonic solid as a substitute for the high resolution rock to save tremendous working time. And created a switch to have an option. May taught me how to make the rock by using mountain node, so many thanks to her! Mr. Ron taught me how to use the copy node. With that I checked on tutorials to have a randomise scale for each rock. Using the same expression I used it for the offset of the rocks so that every rock will have a different shape.
Rocks
I tried rigid body to have it more realistic but it does not work. So I continued with the external force.
with sprites.
I used the particles and rendered them as sprites and have them to change in scale over time, where I learnt from the Tornado tutorial. I will upload the video tomorrow as it is still rendering and as for now I will have my dinner with May!
Okay, today I spent half of the day going through Ruth's displacement shader. What I understand is that ,if I'm not wrong, the displacement changes as the normals move by using a "If-Then-Block" node. But when I look into that node it was a large network and very complicated. With the current knowledge of material shaders I could not handle such complexity. But luckily there was Mr. Ron and he have a better method to achieve whatever I was achieving. And so he created a displacement shader with noise in less than a minute. He explained what each node does.
Displacement Shader Network
By linking the surface position of the Global Variables to the displacement along normals I am able to have what ever displacement shape I want depending on the noise pattern.
This is done by using turbulent noise.
He also fix my shader so that the opacity control will be serperated from the color ramp.